
How to Putting iPod into Disk Mode?
When you have plugged your iPod in to the PC and it does not appear as a drive which you can access, you may need to put it in Disk Mode.
Do this procedure at your own risk. While we have not had any problems performing this on our test iPods, there is no guarantee things wont go wrong.
If you have an iPod with a Click Wheel including:
Fifth Generation iPod
iPod mini
iPod (Click Wheel)
iPod with a color display
iPod photo
iPod nano
1: Before you start, make sure the iPod is fully charged.
2: Toggle the Hold switch on and off. (Set it to Hold, then turn it off again.)
3: Press and hold the Menu and Select buttons for at least 6 seconds until the Apple logo appears.
4: When the Apple logo appears, release the Menu and Select buttons and immediately press and hold the Select and the Play/Pause buttons until the Disk Mode screen appears.
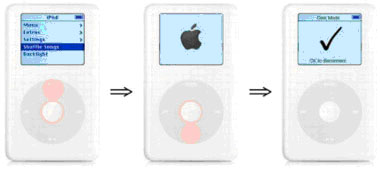
5: Disconnect iPod from the power adapter and connect it to your computer; the screen on the iPod will change and say "Do not disconnect"
For older models without a Click Wheel
Make sure iPod is fully charged.
Toggle the Hold switch on and off. (Set it to Hold, then turn it off again.)
Press and hold the Play/Pause and Menu buttons until the Apple/iPod logo appears, then release them. This resets iPod. When you reset iPod all your music and data files are saved, but some customized settings may be lost.
When the Apple logo appears, immediately press and hold the Previous and Next buttons until the Disk Mode screen appears. (For iPod Software 1.0 through 1.1, a FireWire logo appears on the screen.) Some iPods will show a "OK to Disconnect" message before you connect it to the computer. This changes to "Do Not Disconnect" after connecting.
Disconnect iPod from the power adapter and connect it to your computer.
Do this procedure at your own risk. While we have not had any problems performing this on our test iPods, there is no guarantee things wont go wrong.
If you have an iPod with a Click Wheel including:
Fifth Generation iPod
iPod mini
iPod (Click Wheel)
iPod with a color display
iPod photo
iPod nano
1: Before you start, make sure the iPod is fully charged.
2: Toggle the Hold switch on and off. (Set it to Hold, then turn it off again.)
3: Press and hold the Menu and Select buttons for at least 6 seconds until the Apple logo appears.
4: When the Apple logo appears, release the Menu and Select buttons and immediately press and hold the Select and the Play/Pause buttons until the Disk Mode screen appears.
5: Disconnect iPod from the power adapter and connect it to your computer; the screen on the iPod will change and say "Do not disconnect"
For older models without a Click Wheel
Make sure iPod is fully charged.
Toggle the Hold switch on and off. (Set it to Hold, then turn it off again.)
Press and hold the Play/Pause and Menu buttons until the Apple/iPod logo appears, then release them. This resets iPod. When you reset iPod all your music and data files are saved, but some customized settings may be lost.
When the Apple logo appears, immediately press and hold the Previous and Next buttons until the Disk Mode screen appears. (For iPod Software 1.0 through 1.1, a FireWire logo appears on the screen.) Some iPods will show a "OK to Disconnect" message before you connect it to the computer. This changes to "Do Not Disconnect" after connecting.
Disconnect iPod from the power adapter and connect it to your computer.
Related Guides:
How to convert and burn video files to DVD?
How to convert among various video formats?
how to convert and burn AVI/MPEG/DivX video to DVD?
How to burn protected iTunes movie and TV shows to DVD disk?
Backup your iPhone before unlocking. (recently updated)
how to watch your iPod Movie on TV (recently updated)
